
Light dumbbells—I'm talking 5-8 pounders—live in a weird in-between space in the fitness world. They're incredibly popular and are in every gym and most homes, and you can usually pick up a pair for about the price of a 12-pack in many stores. And yet, they have a bad reputation as something that is basically useless for strength training. In my experience, this is undeserved.
Now, no one is saying you should expect to be able to "get strong"—whatever that means—using only a set of 5-8 pound dumbbells, but you can absolutely use them to create a more effective bodyweight-and-weight workout. And no, it won't involve doing endless reps. I promise!
You can also do several of these moves in my nine-week program True Muscle, exclusively in BodyFit.
1. Single-Leg Knee-Tap Squat
Consider this the alternative to the pistol squat, a popular and cool-looking exercise, but not one that I use or recommend to clients or athletes. If you want to do pistols, hey, go ahead; I simply think the single-leg knee-tap squat (also known as an "airborne lunge" or occasionally a single-leg skater squat) is a better option. This is because it more closely resembles the body positions (i.e., joint angles) common to sports. It also more closely resembles optimal double-leg squat form than the pistol does.
A nice thing about knee-tap squats is that you can perform them at different heights, at different rep ranges, and either weighted or unweighted. Whatever you do, just don't let that back foot touch the ground!
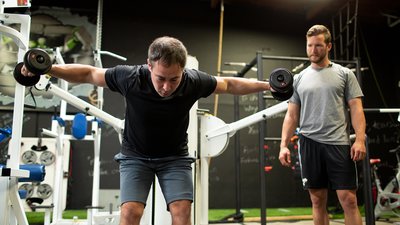
As you can see in this video where I coach former NFL player Steve Weatherford through it, it's a difficult move to do even with just your body weight. Every extra pound you add makes it a lot tougher—even just a pair of light dumbbells.
A cool thing about doing this with dumbbells, though, is that you can use them to make it easier or harder, depending on what you need. If the bodyweight version is really tough for you, holding one or two light dumbbells out in front of you provides a counterbalance that can help you perform more reps. But if you can perform bodyweight reps with ease, adding weight can help you manage those reps.
Here's how to perform them in either case.
Setup and Coaching Tips:
- Stand in front of a pad that is 2-3 inches (about 8-13 cm) thick, a small stack of weight plates with a mat on top, or a workout step.
- If using dumbbells as a counterbalance, we use a modified "racked" position. Also, slide your pinky fingers to the inside of the dumbbell and allow the other end to rest on top of the front of your shoulders.
- Shift your weight to your left leg and lift your right foot off the floor with the knee bent and slightly behind your left leg.
- Slowly lower yourself toward the floor by bending your weight-bearing knee and sitting back at your hips until you lightly tap your back knee on the pad.
- Do not allow your back (non-weight-bearing) foot to touch the floor.
- Reverse the motion and stand up again.
- Find the lowest platform you can lightly tap your back knee to and move smoothly and with control; avoid jerking your torso forward to initiate each rep.
- Perform all reps on the same side before switching sides.
2. Single-Leg Drop Squat
Single-leg training is not only a great way to add a new challenge to your workouts and add variety to your training, it's also just what the muscle doctor ordered to bring up your weak side—sorry, we all have one—and improve your muscle symmetry. This is why both the knee-tap squat and the single-leg drop squat have been longtime staples in the strength programs I design for athletes.
The difference between the two single-leg squat variations is that the knee-tap squat involves more of a forward torso lean, and therefore involves more contribution from the glutes. The drop squat demands a more upright torso, which works the quadriceps slightly more. Since you want to be strong in both areas, it's a great idea to use both of these single-leg squat variations—but probably not on the same training day—in your strength training. A simple way to do this is to alternate them every week, or every few weeks.
Similar to the knee-tap squat, holding the dumbbells with your arms extended out in front of your shoulders creates a counterbalance that allows your torso to remain more upright. Plus, standing on top of a weight bench, plyo box, or chair allows you to drop your leg straight down instead of behind you, which also allows you to remain more upright.
Since your shoulders will get tired quickly if you hold the dumbbells out in front of your shoulders throughout the entire set, lower your arms down to your sides at the top of each rep. In other words, you basically perform a dumbbell front raise as you lower yourself down to the bottom of the drop squat. It's a simultaneous action of raising your arms up as you drop down into each rep, and lowering your arms down to your sides as you stand up out of the bottom of each rep.
Setup and Coaching Tips:
- Stand with a weight bench, plyo box, or chair on your left side. Place your left foot on top of the bench and place most of your weight on your left leg. From the side view, your right foot (on the floor) will be behind your left foot (on the bench).
- Step on top of the platform by straightening your left knee. Once you're on top of the platform, allow the inside of your right foot/ankle to gently touch the bench to help maintain your balance.
- While keeping all of your weight on your left leg, slowly lower yourself toward the floor by bending your knee and hip while simultaneously raising your arms in front of your shoulders.
- At the bottom of each rep, your arms should be roughly parallel to the floor, your weight-bearing foot staying flat on the platform with your knees in line with your toes.
- Either tap the ball of your foot or your heel down to the floor at the bottom of each rep. Touching your heel down by flexing your toes upward increases the difficulty over touching the ball of your foot down.
- Reverse the motion and stand up again while simultaneously lowering your arms back down to your sides.
- Find the highest platform you can stand on while being able to lightly tap the floor and move smoothly and with control; avoid jerking your torso forward to initiate each rep.
- Perform all reps on the same side before switching sides.
3. Bulgarian Split Squat and Single-Leg RDL Combo
This combination of two proven lower-body exercises will have your glutes pumped and burning like never before—even with light dumbbells!
As the name implies, 1 rep demands performing a rep of the Bulgarian split squat, then performing a single-leg Romanian deadlift, keeping your rear leg elevated.
Setup and Coaching Tips:
- Stand tall while holding a dumbbell in each hand at your sides. Place one foot on top of a bench or chair behind you that is roughly at knee height. Your front leg should be far enough in front of the platform that your shin can stay nearly vertical as you drop into each rep.
- You can also do a bodyweight version of this exercise by allowing your hands to hang down at your sides or by interlacing your fingers behind your head. No matter how you perform it, keep your weight on your front foot throughout the exercise.
- Perform the Bulgarian split-squat portion of the rep by lowering your body toward the floor without allowing your back knee to rest on the floor.
- As you lower your body, keep your back straight and lean forward at about a 45-degree angle. Drive your heel into the ground to raise your body to the starting position, thus completing half of the rep.
- Perform the single-leg RDL portion of the rep by hinging at your hip and bending forward toward the floor, keeping your back and arms straight; keep your weight-bearing knee bent at roughly 15-20 degrees.
- Do not allow your lower back to round out as you hinge your hips and lower your torso.
- Once your torso is roughly parallel to the floor, reverse to complete 1 rep.
- Perform all reps on one side before switching to the other leg.
4. Counterbalance Reverse Crunch
Abs may be revealed in the kitchen, but they're built and strengthened in the (home) gym. And despite what some trainers tell you, spinal flexion-based core exercises like reverse crunches can be perfectly safe and effective—if you do them right. Unfortunately, reverse crunches are commonly done, even by trainers, in a much less effective way than they should be. Here's how to avoid the common mistakes and get the most out of them.
When performing this exercise, most people use momentum and jerk their bodies up and down by kicking their legs to create the movement. Holding the dumbbells over your head as shown in the video creates a counterbalance to help you better control the movement. This not only reduces cheating, it also is more focused on using abdominal muscles to perform the action.
Setup and Coaching Tips:
- Lie on your back on the floor with your knees bent and your hips flexed into your belly.
- With your elbows bent, hold a dumbbell in each hand just behind and above your head at roughly a 45-degree angle.
- Smoothly and under control, do a reverse crunch by rolling your lower back up off the floor and bringing your knees toward your chin.
- Do not use momentum or jerk your body.
- Slowly reverse this motion, lowering your spine back down toward the floor, one vertebra at a time. Do not allow your legs to extend or your head to lift off the ground at any point.
5. Overhead Stability-Ball Crunch
Holding your arms overhead while doing crunches makes this exercise seriously tough. If you don't believe me, try it this way for a few reps, then try a few reps by holding the dumbbells in front of your chest.
Also, if your goal is to focus on your abs when doing ball crunches (i.e., if your goal is to do them properly), the ball shouldn't move under you at all. It's common for the ball to roll back and forth as you perform the crunches. Don't let it! Instead, keep your knees bent at roughly a 90-degree angle, and flex and extend your spine with control over the ball.
Setup and Coaching Tips:
- Lie face up with a 22-26-inch (55-65 cm) stability ball in the arch of your lower back. Hold a dumbbell in each hand with your arms above your head, keeping your elbows slightly bent and palms facing each other.
- Keeping your arms above your head, perform a crunch. Pause for 1-2 seconds at the top of each rep.
- Don't sit all the way up with your torso perpendicular to the floor. Doing so removes the tension from the abs.
- Slowly reverse the motion, allowing your abdominal muscles to stretch over the ball. Do not allow your neck to hyperextend in the bottom position; keep your neck in a neutral position throughout.
6. Side Elbow Plank Rear-Delt Raise or External Rotation
This is two exercises in one, both representing a way you can spice up front and side planks—because, let's face it, they're boring to perform. Adding light dumbbell shoulder exercises to these static exercises adds a new challenge for maintaining the plank position while you move the dumbbell and makes this exercise more interesting to perform. Plus, you get two things done at once by training your shoulders along with the lateral core muscles.
Setup and Coaching Tips:
- Place your left forearm on the floor with your elbow directly underneath your shoulder. Place your right foot in front of your left foot, keeping your hips and knees off the ground and your body in a straight line. Use a pad or a rolled towel underneath your elbow for comfort, if necessary. Hold a dumbbell with your top hand.
- Maintain the side plank position throughout, without allowing your torso to rotate or hips to sag toward the floor.
7. Shoulder YTWL Circuit
Shoulder Ys are difficult, which is why even the strongest people get challenged using light dumbbells. If all you do is Ys, that's still great. But if you really want to give your upper back and postural muscles some love—and most of ours could use some—then do 5, 10, or 15 reps of each of these letters in a row.
Setup and Coaching Tips:
- Bend over at your hips, keeping your back straight so that your torso is parallel to the floor and your knees are bent 15-20 degrees.
- Holding a dumbbell in each hand, let your arms hang down toward the floor with your palms facing in.
- Shoulder Y: Keeping a small bend in your elbows, raise your arms out to shoulder height, pointing your thumbs toward the sky in a Y shape. Do not swing your arms up.
- Shoulder T: In that same bent-over position, raise your dumbbells out with straight arms, and your palms facing the floor.
- Shoulder W: Bend your elbows almost like the top position of a biceps curl in front of your body. Keeping your elbows in contact with your sides, bring your arms back into a W position, pinning your shoulder blades together.
- Shoulder L: Think of this like an L row. Start with the dumbbells hanging down in front of you and row them up to a bent-arm T position. Then, rotate them externally, or up by your ears. Rotate them back down, and lower them to the bottom position of the row.
- For each movement, pause for 1 second at the top of each repetition, then slowly lower your arms in front of your torso. Do not allow your back to round out at any time.
8. Iso-Dynamic Side Shoulder Raise
I went in-depth into iso-dynamic dumbbell training years ago in the article, "Smart Dumbbell Lifting: Iso-Dynamic Training," but the short explanation is that within a set of a given dumbbell exercise, you hold one side in an isometric contraction while the other arm moves through a dynamic (concentric and eccentric) movement. Then, in the same set, you switch so that the side that was doing the isometric moves dynamically.
When you've got light dumbbells, this technique works great for shoulder exercises like the shoulder Ys, front raises, side raises, and rear-delt flyes.
Setup and Coaching Tips:
- In a standing position, lift two dumbbells up to parallel to the floor, but only let one drop.
- After you perform several reps on the dynamic side, switch so your right arm performs the dynamic reps and your left arm holds isometrically.
Simple enough, right? Because iso-dynamic reps get progressively more difficult, they're perfect for a descending rep scheme such as a 5-4-3-2 ladder. Perform 5 dynamic reps on your right side while your left side does the isometric hold. Then switch and perform 5 dynamic reps on your left side while your right side performs a hold. Repeat the process doing 4 dynamic reps on each side, and then 3 reps.
To finish, perform 2 reps in a bilateral fashion (i.e., using both arms simultaneously). If you're struggling for mental clarity at the end of the ladder, remember it this way: 2 arms for 2 reps.
Interested in seeing these movements put into action? Try the True Muscle program in BodyFit. Each workout starts with a feel-good bodyweight warm-up, hits the strength and muscle sweet spot, and uses low-equipment finishers to leave you in a heap!